Baked Spinach Artichoke Protein Pasta

Baked Spinach Artichoke Protein Pasta

Meal Prep is easiest when you can make a large batch of one thing that can last through the beginning of a crazy week. One of my favorite foods to prep in advance is pasta – it’s always great warmed up and holds up well in the fridge or the freezer. This recipe was originally presented at a Culinary Workshop class I recently helped to lead, and I adapted it, pumped up the protein with legume-based pasta and Greek yogurt and used my Skinny Spinach Artichoke Dip as a base to make it my own. The result was creamy, spinach artichoke deliciousness – and a ton of leftovers – perfect for a busy week ahead!

spin-art-pasta-3

Ingredients (Serves 8):

8 oz legume-based pasta, dry (I used Banza pasta- a chickpea pasta with added pea protein!)

1 medium onion, chopped

1 large garlic clove, minced

1 Tbsp olive oil

1 1/2 C plain, 2% Greek yogurt

2 Tbsp all purpose flour

1/2 C parmesan cheese, grated

3/4 C part-skim mozzarella, shredded

2 Tbsp smoked paprika

2 tsp garlic powder

1 can (about 15 oz) artichoke hearts, drained well (if salted, rinse and drain to remove excess sodium)

3 Cups frozen, chopped spinach, thawed

1/4 C low sodium vegetable broth

1/2 tsp ground black pepper

Nonstick oil cooking spray

spin-art-pasta-1

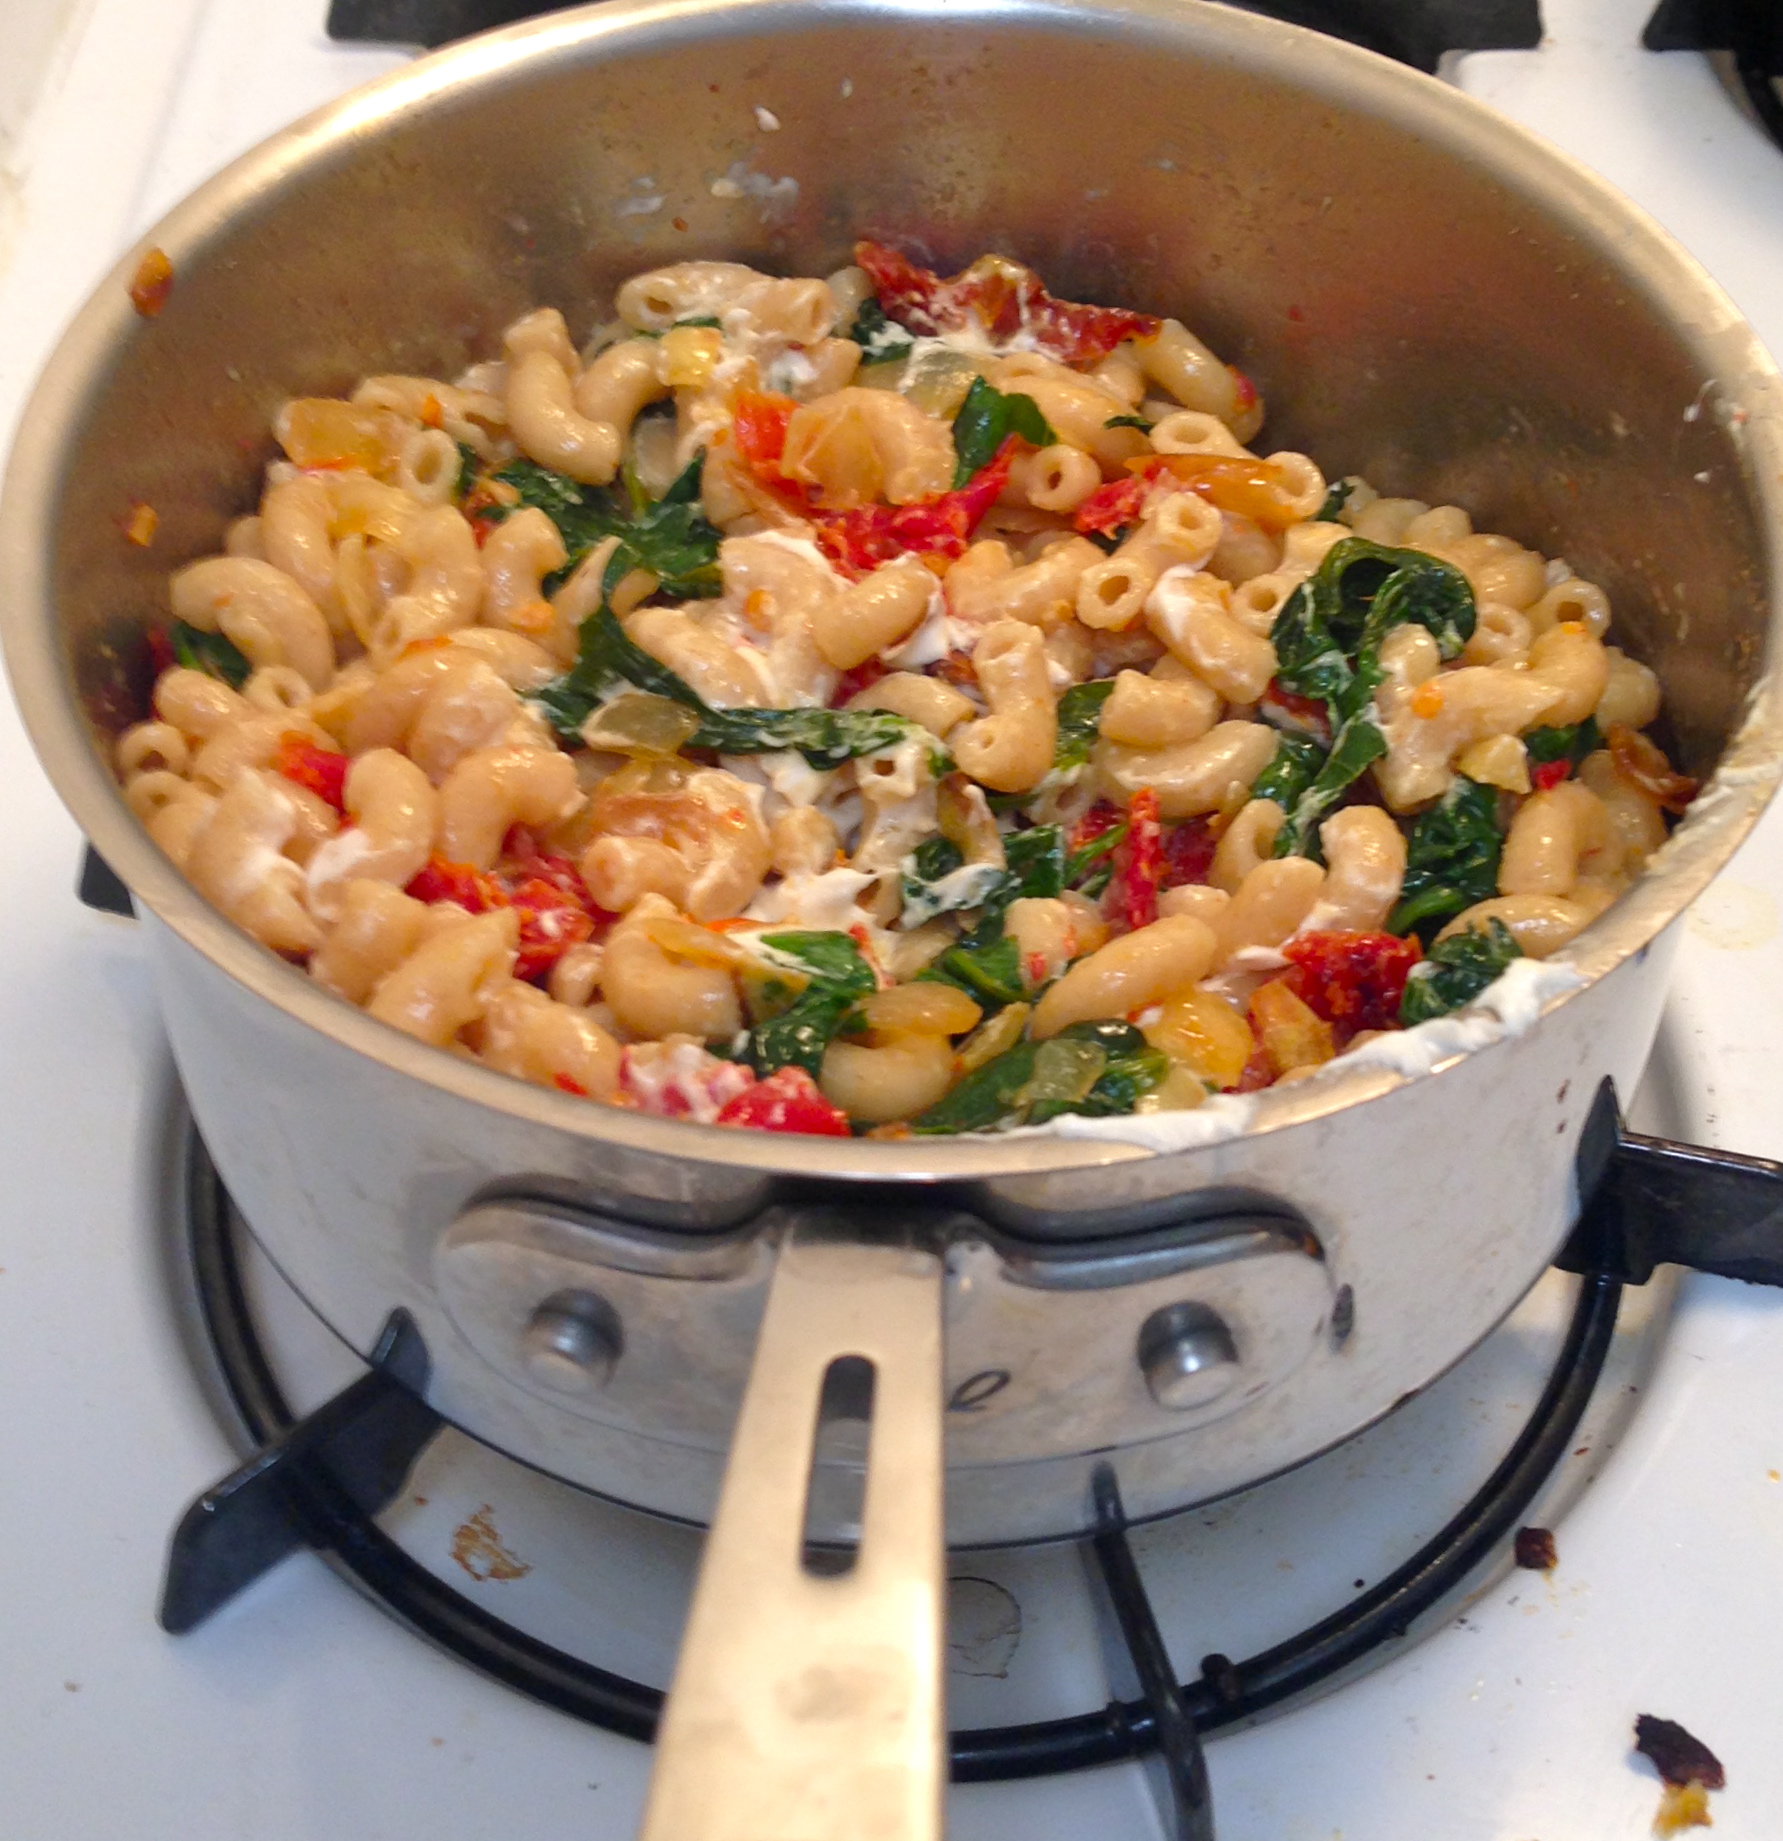
Now just stir in pasta!

Directions:

  1. Bring a large pot of water to boil (add a dash of salt if desired).
  2. Preheat oven to 350 degrees Fahrenheit.
  3. While water is boiling, squeeze out any excess water from the spinach and artichokes (they must be dry before adding to recipe). Set aside.
  4. Heat oil in medium-sized skillet over medium heat. Add onion, stir and sauté for about 4-5 minutes. Add minced garlic, stir, and sauté for another 2-3 minutes. Remove from heat and set aside.
  5. Add pasta to boiled water and cook according to directions on package, stirring occasionally. Watch the pasta closely, as many legume-based pastas can get mushy quickly! Be careful not to overcook.
  6. In a large mixing bowl, combine yogurt, flour, spices (paprika, garlic powder, ground black pepper), parmesan cheese and about 1/4 of the mozzarella cheese. Add spinach, artichokes, onion/garlic mixture and vegetable broth and stir until ingredients are well combined.
  7. Once pasta is cooked, drain in a colander and add to mixing bowl. Stir all ingredients until pasta is coated well with yogurt mixture.
  8. Spray a casserole dish (9 x 13 inches) with nonstick cooking spray, add pasta and yogurt mixture to dish and spread evenly with a spoon or spatula. Bake in the oven for 25 minutes. After 25 minutes, remove from oven, add the remaining mozzarella cheese on top of the pasta and bake for another 5-10 minutes, until cheese is melted. Serve and enjoy!

The Goods: What’s Inside?

Nutritional Analysis Per Serving: Calories 262 calories, Total Fat 8 g, Saturated Fat 4 g, Cholesterol 15 mg, Carbohydrates 29 g, Fiber 7 g, Protein 19 g, Sodium 318 mg, Calcium 274 mg

spin-art-pasta-2

Ready to bake in the oven!

Advertisement

Cauliflower “Fried Rice”

Cauliflower Fried Rice

This “fried rice” takes care of that comfort-food craving, without all of the calories. This veggie-filled dish is topped with eggs and chicken – lean protein sources that are sure to fill you up – and comes in at about 300 calories per serving!

cauliflower fired rice

Ingredients (serves 4):

1 1/2 lbs. cauliflower “rice” (you can buy this at many grocery stores, or you can simply cut a large head of cauliflower into small pieces)

1 lb. chicken breast cutlets

1 medium sweet onion (or you can use scallions), chopped

1 yellow squash, chopped

1 zucchini, chopped

2 large cloves garlic, minced

3/4 C carrots, sliced

1/2 C frozen peas, thawed

1 1/2 Tbsp olive oil

1 tsp rice vinegar

3 Tbsp teriyaki sauce ( I like Trader Joe’s Soyaki) – just watch out for sodium and sugar!

Nonstick vegetable oil cooking spray

Dash ground black pepper

1/2 tsp onion powder

1/4 tsp garlic powder

1 large egg plus 1 large egg white, scrambled (raw)

chicken stir fryDirections:

  1. Cut chicken into small pieces. Spray large saucepan or wok with nonstick vegetable oil cooking spray. Add 2 tsp olive oil and warm over medium heat. Add chicken and 1 1/2 Tbsp teriyaki sauce and cook until cooked through (about 10-15 minutes), stirring occasionally. Remove chicken from pan and set aside.
  2. Steam carrots (you can use a steamer or place in microwave safe bowl, add a splash of water, cover and cook on “high” for about 2 minutes, until softened and bright.
  3. Add 1 tsp olive oil to pan and warm over medium heat. Add onions, zucchini, yellow squash and spices (ground black pepper, onion powder, garlic powder) and cook until softened, about 10-12 minutes. Add minced garlic, peas, carrots and another 2 teaspoons teriyaki sauce. Cook another 5-7 minutes, remove from pan and add to dish with chicken.
  4. Add remaining olive oil and remaining  teriyaki sauce to pan and warm over medium-high heat. Add cauliflower “rice”and sauté for approximately 5 minutes. Add scrambled eggs and stir until cooked through. Add chicken and veggies, stir until well combined and remove from heat. Serve and enjoy!

veggies stir fry

The Goods: What’s Inside?

Nutritional Analysis Per Serving:

Calories 300 calories, Total Fat 9 g, Saturated Fat 2 g, Cholesterol 112 mg, Carbohydrates 23 g, Fiber 7 g, Protein 35 g, Sodium 431 mg, Calcium 96 mg


Why Take-Out When You Could Dine In?

Whole Wheat Cous Cous With Chickpeas, Edamame and Peanuts in a Peanut Butter Sauce

This take-out inspired dish is filled with peanut butter-y goodness and offers a fun, different way to enjoy vegetarian protein. Filled with fiber, protein and lower in calories and sodium than traditional take-out, this homemade version will become your new busy night go-to dish!

couscous


Ingredients (serves 6):

Peanut Butter Teriyaki Sauce:

1/3 C natural, creamy peanut butter

2 Tbsp teriyaki sauce (I like Trader Joe’s Soyaki Sauce)

2 Tbsp rice vinegar

1/4 C water

1/2 tsp hot sauce (I like Cholula or Frank’s Red Hot)

dash crushed red pepper flakes (depends how hot you like it!)

dash ground ginger

*optional: ~1/2 tsp honey to create a sweeter peanut sauce (not included in nutritional analysis)

pb sauce

Peanut Sauce!

Stir Fry:

1 C whole wheat cous cous, dry

1/2 large onion, chopped

1 garlic clove, minced

3/4 C carrots, shredded

1 can (15 oz) garbanzo beans (try to find a brand with no added salt – or rinse and strain beans to remove excess salt)

1/4 C edamame, shelled,  unsalted and ready-to-eat

5 oz baby bok choy (about 4-5 baby bok choy)

2 Tbsp water

1/4 C peanuts, roasted and unsalted (just the kernels)

*Note: Depending on whether or not you use a nonstick skillet, you may want to add either a nonstick vegetable oil spray or a small amount of olive oil to your skillet in the third step (while you add the spoonful of sauce). If adding olive oil, note that 1 Tbsp olive oil has about 120 calories and 14 grams of fat  (this is not accounted for below in the nutritional analysis). 

Directions:

  1. Mix all sauce ingredients in a medium bowl until well-combined. Set aside.
  2. Cook the cous cous according to box directions (I bring 1 C water to a boil, add 1 C dry cous cous, stir, remove from heat, cover and allow to sit for about 5-7 minutes, until all water is absorbed and cous cous is fluffy).
  3. Add a small spoonful of peanut sauce to a large skillet or wok and heat over medium heat. Add onion, garlic, carrots and chickpeas and cook for about 5 minutes, stirring occasionally, until onion is translucent and slightly browned.
  4. Add edamame, baby bok choy and 2 Tbsp water, stir and cover for approximately 3-5 minutes, until baby bok choy is bright green and softened. Add peanuts, stir and cook another 2-3 minutes, uncovered.
  5. Add cous cous and the remaining peanut sauce to skillet and mix all ingredients until well combined. Serve and enjoy!

The Goods: What’s Inside?

Nutritional Analysis Per Serving

Calories 321 calories, Total Fat 11 g, Saturated Fat 2 g, Cholesterol 0 mg, Carbohydrates 39 g, Fiber 7 g, Protein 14 g, Sodium 438 mg, Calcium 82 mg

skillet couscous

Cozy Up To This Turkey Chili!

Turkey Chili with Red Kidney Beans

This is my go-to dish on cold days, and it makes so much that I can save it to have on busy days throughout the week. This lean chili skimps on fat while filling you up with healthy protein! Additionally, this chili supplies a ton of vegetables, including onion, pepper and tomato, along with protein and fiber-rich beans. Rich in beta carotene (which our body can convert to vitamin A), vitamin C and potassium, this cozy comfort food will become your new winter (or spring – if the weather stays this cold!) favorite.

IMG_0524

Ingredients (serves 4):

16 oz ground, lean turkey meat

1 bell pepper, chopped (I like to use green bell pepper for this recipe, but any variety works!)

1 vidalia or sweet onion, chopped

2 cloves garlic, minced

20 oz canned crushed tomatoes (can also use diced or fresh)

8 oz tomato sauce

15 oz red kidney beans, rinsed and drained if canned

1 tsp hot sauce (I like Cholula)

2 tsp oil

2 tsp chili powder

1/2 tsp sugar

1/2 tsp garlic powder

1/2 tsp onion powder

1/2 tsp ground back pepper

dash salt


Directions:

1. Warm oil in large pot over medium heat. Add chopped onion and pepper and cook approximately 8-10 minutes, until softened.

2. Add the turkey meat and stir occasionally until the meat is cooked through, about 20 minutes. Add the garlic and cook another 2-3 minutes.

3. Add the crushed tomatoes, tomato sauce, kidney beans, hot sauce, sugar and spices ( chili powder, garlic powder, onion powder, salt and pepper). Bring everything to a boil and let boil about 10 minutes. Reduce heat and simmer covered for about 1 hour. Enjoy!

The Goods: What’s Inside?

Nutritional Analysis Per Serving:

Calories 391, Total Fat 17 g, Saturated Fat 4 g, Cholesterol 89 mg, Carbohydrates 31 g, Fiber 13 g, Protein 30 g, Sodium 446 mg, Calcium 149 mg


Easy Veggie Bowl Inspired By Bibimbap

Bibimbap -Style Vegetable Bowl

This veggie bowl is loaded with vitamins and minerals, such as beta-carotene (which our bodies convert to vitamin A), vitamin C, calcium and folate, while also offering fiber, protein, healthy fats  and a spicy kick! And the best part? It takes less than 20 minutes to prepare. This is my new go-to dish for busy weeknights!

IMG_2852

Ingredients (serves 1):

1/2 C brown rice, cooked (I like to make a lot of rice at once and keep it on hand for dishes throughout the week – just heat it up before everything is finished cooking!)

1/4 C extra firm tofu, cubed and drained (remove excess water by squeezing in paper towel or cloth)

2 carrots, sliced (or about 1/3 C)

1 C spinach, raw

1/2 onion, chopped (or feel free to use shallots or scallions)

1 large egg

1 Tbsp oil

3 Tbsp hot sauce (I like Cholula)

Nonstick vegetable oil cooking spray

1/4 tsp garlic powder

1/2 tsp onion powder

Dash ground black pepper

Almost ready - now just top with egg and hot sauce!

Almost ready – now just top with egg and hot sauce!

Directions:

1. Warm oil in medium-sized saucepan over medium heat. Add onion and cook until softened, about 5 minutes, stirring occasionally.

2. Steam carrots (you can do this by covering them in a bowl and placing in the microwave for about 1 minute, or steaming them over the stovetop).

3. Add tofu to onions in saucepan. Add spices and mix all ingredients together. Cook until tofu is slightly browned, about 5 minutes. Add 2 Tbsp hot sauce, stir ingredients together and cook another 1-2 minutes.

4. Spray small pan with nonstick vegetable oil cooking spray and warm over medium heat. Crack egg into pan and sprinkle with dash of pepper. Cover with a plate and cook until egg white is cooked, leaving the yolk slightly runny (about 3-5 minutes). Set aside.

5. Add spinach to saucepan with onion and tofu and stir 2-3 minutes, until spinach is wilted.

6. Place rice in bowl. Top with tofu and vegetables. Add egg to bowl and drizzle remaining 1 Tbsp hot sauce over entire dish. Enjoy!

The Goods: What’s Inside?

Nutritional Analysis Per Serving

Calories 434 calories, Total Fat 24 g, Saturated Fat 4 g, Cholesterol 186 mg, Carbohydrates 37 g, Fiber 6 g, Protein 19 g, Calcium 158 mg, Sodium 385 mg

It’s Soup Season!

Mushroom Barley Soup

This soup is a winter favorite of mine! The barley adds a hearty taste and texture to the warming vegetable soup, plus it’s packed with nutrients like fiber from the barley and vegetables, beta-carotene (which our body converts to vitamin A) from the carrots and B-complex vitamins from mushrooms. I usually make a large pot of this soup early in the week and eat a bowl every day with lunch or dinner (or sometimes both)! Perfectly portable for work and perfectly nutritious, this homemade soup is a must-try for cold winter days!

IMG_2623

Ingredients (serves 10):

8 C low sodium vegetable broth

8 C water

1 C barley, uncooked

5 C mushrooms, sliced

1 sweet onion, small, chopped

3 garlic cloves, chopped finely

1 C carrots, chopped

1/2 C celery, chopped

1 Tbsp butter or margarine

3/4 tsp salt

3/4 tsp ground black pepper

1/4 tsp garlic powder

1/4 tsp onion powder

Directions:

1. Melt butter in a large pot. Add onions and mushrooms and sauté until slightly browned and softened, stirring occasionally (approximately 10 minutes).

2. Add carrots and celery. Add liquid (water and vegetable broth). Add spices. Bring to a boil and cook for approximately 15 minutes, until vegetables are softened.

3.Add barley and boil for another 10 minutes. Cover and reduce to a simmer for about 1 hour, stirring occasionally. Serve and enjoy!

*I love to make this soup for the entire week. If you still have leftovers at the end of the week, just store in single or double serving, airtight containers in the freezer!

The Goods: What’s Inside?

Calories 91 calories, Total Fat 1 g, Saturated Fat 0 g, Cholesterol 0 mg, Carbohydrates 18 g, Fiber 4 g, Protein 3 g, Sodium 312 mg, Calcium 32 mg

May require serious stove clean-up, but so worth it! My pot wasn't large enough and some boiled over...live and learn!

May require serious stove clean-up, but so worth it! My pot wasn’t large enough and some boiled over…live and learn!

Pasta with Sun-dried Tomatoes and Basil

Whole Wheat Pasta with Sun-Dried Tomatoes, Chèvre and Basil

Can you tell I had some leftover sun-dried tomatoes and basil from my last dish? I decided to make use of the large quantities in which these foods are often sold and make my favorite pasta dish. This dish contains calcium, lycopene, vitamin C and fiber, and only takes about 20 minutes to whip up! Lycopene is a powerful antioxidant and is known to be abundant in tomatoes, giving them their deep, red color. Also, the fiber in this dish keeps you full and prevents severe blood sugar spikes normally seen with refined carbohydrates.

IMG_2102

Ingredients (serves 2):

1 C whole wheat pasta, dry

1.5 oz chèvre

1/4 C sun-dried tomatoes (not packed in oil)

2 Tbsp basil, chopped

1/2 small onion, chopped

2 cloves garlic, chopped

3 Tbsp olive oil

1/2 tsp ground black pepper

1/2 tsp onion powder

1/4 tsp garlic powder

dash salt

IMG_2099Directions:

1. Bring medium-sized pot of water to a boil. Add pasta and cook according to directions on box.

2. Add 1 Tbsp olive oil to medium-sized pan and warm over medium heat. Add onions and cook for 10 minutes, stirring occasionally.

3. Add sun-dried tomatoes, spices and garlic to pan and cook another 5-7 minutes, stirring occasionally.

4. Strain the pasta and set aside, reserving about 1/3 C of pasta water. Add pasta water to pan and cook until all liquid has been absorbed (about another 5 minutes). This will make the pasta taste like it is in a thicker sauce!

5. Add remaining 2 Tbsp olive oil to pot used to cook pasta and replace on stove over low-medium heat. Add pasta and vegetables. Add chèvre and basil to pasta and combine all ingredients well. Serve and enjoy!

The Goods: What’s Inside?

Calories 453 calories, Total Fat 27 g, Saturated Fat 6 g, Cholesterol 15 mg, Carbohydrates 47 g, Fiber 5 g, Protein 13 g, Calcium 77 mg, Sodium 259 mg


A Chicken Dish That Doesn’t Taste ‘Just Like Chicken’

Chicken with Sun-dried Tomatoes, Mushrooms, Zucchini and Basil

Vegetables are actually the shining star of this flavorful chicken dish! This dish boast almost 40 grams of protein per serving with only 12 grams of carbs, along with a plate full of lycopene and vitamin C. I like to prepare this dish on a Sunday night and have leftovers for the busy week – although it is also a beautiful presentation for company.

I served mine over brown rice

I served mine over brown rice!

Ingredients (serves 4):

4 4-ounce chicken breasts

1 C sun-dried tomatoes (not packed in oil)

1 1/2 C mushrooms, chopped

1 large zucchini

2 cloves garlic

4 Tbsp chopped basil

1/4 C olive oil

dash salt

1 tsp ground black pepper

1/8 tsp cayenne pepper

1/2 tsp garlic powder

1/2 tsp onion powder

Nonstick vegetable oil cooking spray

IMG_2092Directions:

1. Preheat oven to 350 degrees Fahrenheit.

2. Chop zucchini. Cut sundered tomatoes so that the pieces are still fairly large. Chop garlic. Set aside.

3. Spray 9 x 13 inch casserole dish with nonstick vegetable oil cooking spray. Place chicken in casserole dish and drizzle 2 Tbsp olive oil over chicken. Top chicken with salt,  garlic powder, onion powder and 1/2 tsp ground black pepper. Bake in oven for about 30 minutes, until chicken is cooked through (the chicken should reach an internal temperature of 165 degrees Fahrenheit.

4. Pour remaining 2 Tbsp olive oil in large saucepan and warm over medium heat. Add mushrooms and zucchini and cook for 8-10 minutes, stirring occasionally. Add chopped garlic, sun-dried tomatoes and remaining 1/2 tsp ground black pepper and cook for another 5. minutes. Add chopped basil and stir. Remove saucepan from heat.

5. Remove chicken from oven and pour saucepan contents over chicken. Enjoy!

The Goods: What’s Inside?

Nutritional Analysis Per Serving:

Calories 366 calories, Total Fat 19 g, Saturated fat 3 g, Cholesterol 96 mg, Carbohydrates 12 g, Fiber 3 g, Protein 39 g, Sodium 414 mg, Calcium 54 mg


Two Bean Baked Chicken

Baked Chicken with Green Beans, Navy Beans and Tomatoes

This dish offers protein, fiber and a ton of vitamins and minerals for minimal calories (and minimal prep time)! Tomatoes offer lycopene, beta carotene and vitamin C, while green beans are a rich source of vitamins K, C, folate and manganese. Navy beans add even more protein to this chicken dish, as well as heart-healthy fiber, to keep you feeling full. I like to make this dish at the beginning of the week so I have healthy, easy leftovers for the beginning of the busy week.

IMG_2084

Ingredients (serves 4):

16 oz thin-sliced chicken breast, raw (4 pieces weighing 4 oz each)

1 1/2 C navy beans, rinsed and strained (I like Eden Navy Beans, No Salt Added)

1 1/2 C green beans, sliced into small pieces (about .5 inches)

1 1/2 C grape or cherry tomatoes, cut into quarters

3 Tbsp olive oil

dash salt

3/4 tsp ground black pepper

1 1/2 tsp garlic powder

1 1/2 tsp onion powder

dash cayenne pepper

Ready to bake in the oven!

Ready to bake in the oven!

Directions:

1. Preheat oven to 360 degrees Fahrenheit.

2. Spray 9 x 13 inch casserole dish with nonstick vegetable oil cooking spray. Place chicken in casserole dish.

3. Evenly distribute the salt, cayenne pepper, 1 tsp garlic powder, 1 tsp onion powder and 1/2 tsp ground black pepper among each chicken breast. Drizzle 2 Tbsp olive oil over chicken breast and place in oven. Bake until chicken is cooked through – approximately 25-30 minutes. the chicken should reach an internal temperature of 165 degrees Fahrenheit.

4. Steam green beans until brightly colored and soft but still tender. *This can be done either by using a steamer or by placing cut green beans in a microwave-safe bowl covered in parchment paper for approximately 1 minute and 30 seconds.

5. Remove chicken from oven. Add navy beans, tomatoes and green beans to casserole dish and distribute so toppings gather around the sides of the casserole dish. Add remaining 1/4 tsp ground black pepper, 1/2 tsp garlic powder and 1/2 tsp onion powder. Drizzle remaining 1 Tbsp olive oil over dish and place casserole dish in oven.  Bake for an additional 10 minutes. Enjoy!

I served mine with a side salad of spinach, bell pepper, tomato, cucumber, avocado and a handful of walnuts!

I served mine with a side salad of spinach, bell pepper, tomato, cucumber, avocado and a handful of walnuts!


The Goods: What’s Inside?

Nutritional Analysis Per Serving:

Calories 328 calories, Total Fat 12 g, Saturated Fat 2 g, Cholesterol 66 mg, Carbohydrates 22 g, Fiber 8 g, Protein 33 g, Sodium 169 mg, Calcium 97 mg

Yum!

Yum!


Rice-Free Salmon Teriyaki

Salmon Teriyaki

Craving take-out? I promise, this is better! This simple dish is a great way to fuel up with protein, healthy omega-3 fatty acids, vitamins and minerals without overdoing the carbs and calories. Load up on vitamins A, C, K and folate with this dish, as well as potassium and zinc. Also, salmon contains high levels of omega-3 fatty acids. The American Heart Association recommends consuming at least two (3.5 oz) servings of omega-3 fatty acids per week, since omega-3 fatty acids may decrease inflammation within the body, which could lower your risk for developing heart disease. This dish supplies almost an entire week’s worth of these anti-inflammatory fatty acids. And the best part is it only takes about a half hour to prepare!

IMG_1920

Ingredients (serves 1):

5 oz wild salmon, raw

1 C broccoli florets, chopped

1/2 medium zucchini, sliced and sliced again into quarters

1/4 C carrots, sliced

1/2 red bell pepper, chopped

1/4 C white button mushrooms, chopped

1/4 C onion, chopped

3 Tbsp Teriyaki marinade (I like Whole Foods’ “Very Teriyaki Marinade” sold by the fresh fish or Newman’s Own Teriyaki Marinade)

1 tsp olive oil

Dash ground black pepper

Nonstick vegetable oil cooking spray

Ready to bake in the oven!

Ready to bake in the oven!

Directions:

1. Preheat oven to 350 degrees Fahrenheit.

2. Spray casserole dish (or cookie sheet, or whichever you prefer to use for the salmon) with nonstick vegetable oil cooking spray. Place salmon in dish and spread 1.5 Tbsp Teriyaki marinade over fish. Place in oven and bake until cooked through (approximately 25 minutes).

3. Heat olive oil in medium sized skillet over medium heat. Add onions and cook 2-3 minutes. Add bell pepper, mushrooms and zucchini and cook another 10 minutes.

4. Place chopped broccoli and sliced carrots in microwave-safe bowl and cover with wax paper. Place in microwave (on high) for 1-2 minutes, until vegetables are bright in color and softened (but not soft).

5. Add broccoli and carrots to skillet. Add remaining 1.5 Tbsp Teriyaki marinade and stir. Cook for another 2-3 minutes.

6. Transfer vegetables from skillet on to a plate. Top with baked salmon and enjoy!

The Goods: What’s Inside? 

Nutritional Analysis Per Serving:

Calories 469 calories, Total Fat 21 g, Saturated Fat 4 g, Cholesterol 84 mg, Carbohydrates 39 g, Fiber 6 g, Protein 34 g, Sodium 1136 mg, Calcium 158 mg

Now just combine with salmon and serve!

Now just combine with salmon and serve!