Baked Halibut with Pineapple Salsa

Baked Halibut with Pineapple Salsa

Pineapple salsa will spice up any plain fish dish – and add a hearty serving of fruits and veggies! This fresh, homemade salsa offers lycopene, an antioxidant found in tomatoes, along with the heat of a jalapeno pepper and the sweetness of pineapple. Although I used halibut in this recipe, any white fish will do. I’ve made this before using sea bass and prefer the less oily texture of the halibut with the salsa. My main suggestion? Try to opt for a wild-caught fish!

IMG_0887

Ingredients (serves 2):

12 oz wild-caught Halibut (or any other white fish of your choice), divided into two, 6-oz portions

1 tsp olive oil

4 roma tomatoes

1 C cubed pineapple

1/2 jalapeno pepper (seeds removed if you don’t want the salsa very spicy)

1/2 small red onion

3 Tbsp fresh cilantro, stems removed (about 5 sprigs)

dash salt

dash ground black pepper

1/8 tsp garlic powder

nonstick vegetable oil cooking spray

IMG_0878

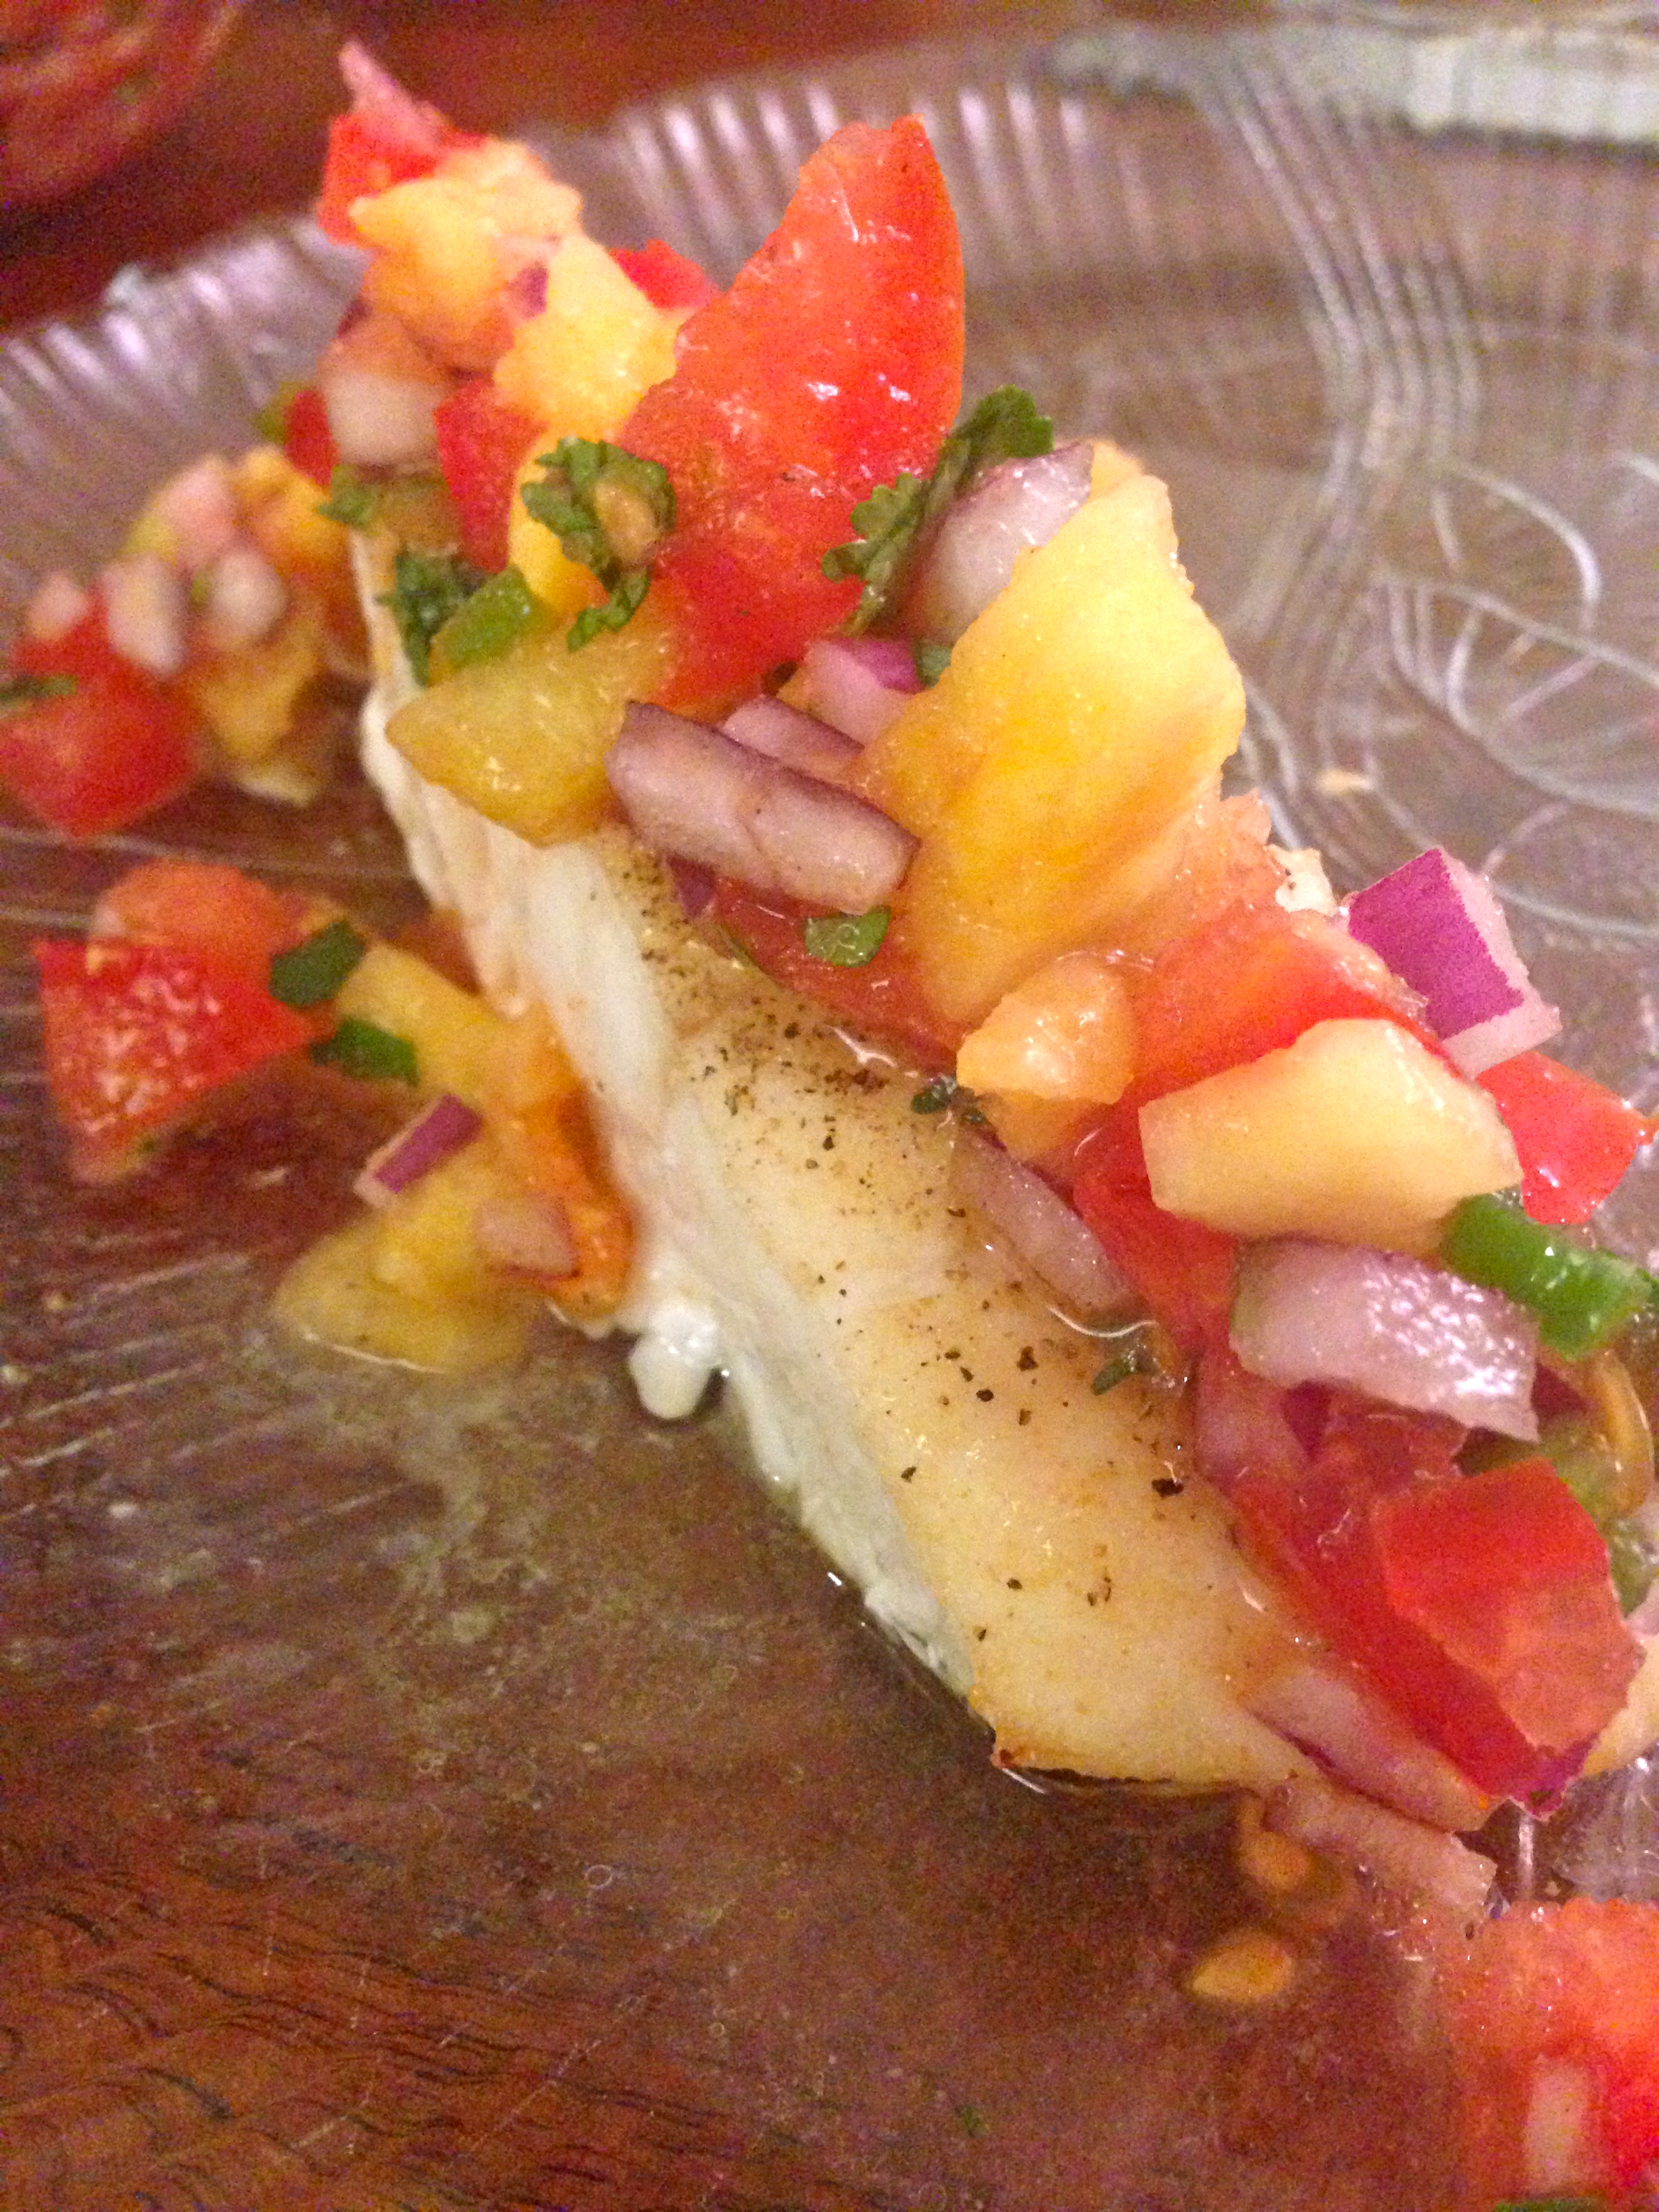
Fresh pineapple salsa!

Directions:

1. Preheat oven to 360 degrees Fahrenheit.

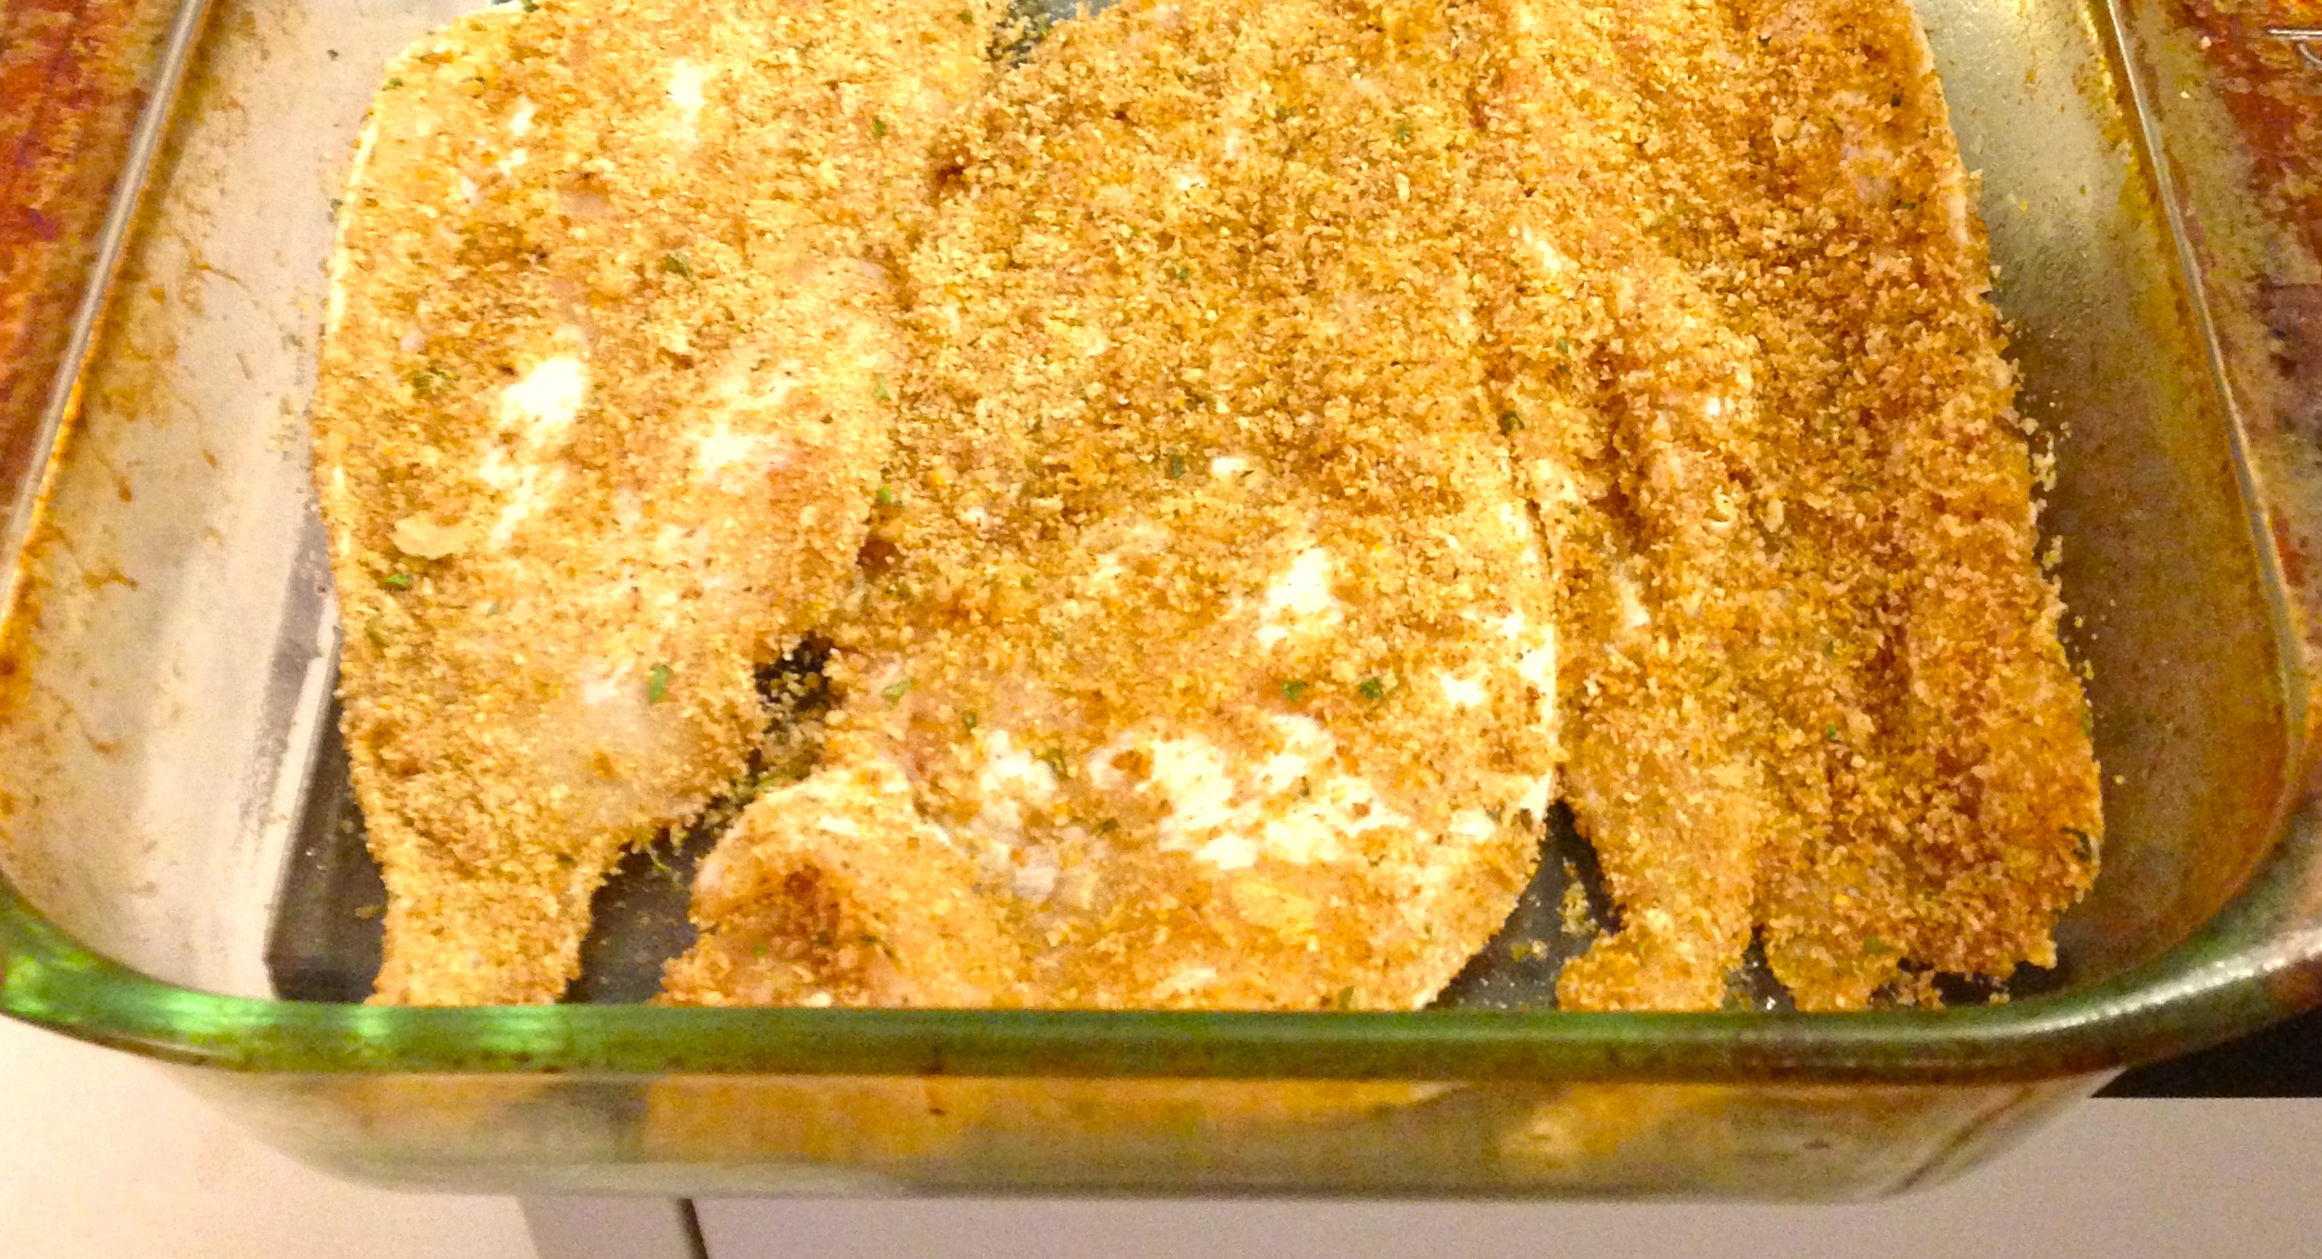
2. Spray casserole dish with nonstick vegetable oil cooking spray. Place halibut in casserole dish and drizzle olive oil over fish, distributing it evenly. Sprinkle salt, pepper and garlic powder over each fish fillet. Set aside.

3. Dice tomatoes, onion, jalapeno and pineapple. Combine in bowl.

4. Rinse cilantro leaves and pat dry. Finely chop cilantro and add to salsa. Add salt and ground black pepper to taste. Combine well and set aside.

5. Bake fish in oven until flakey and opaque, approximately 25 minutes. The internal temperature of the fish should reach 145 degrees Fahrenheit.

6. Remove fish from oven and top each fillet with salsa. Make sure to save some salsa on the side to scoop up with veggies and/or tortilla chips! Enjoy!


The Goods: What’s Inside?

Nutritional Analysis Per Serving:

*1 serving is 1 6 oz fillet with half of the salsa

Calories 340 calories, Total Fat 8 g, Saturated Fat 1 g, Cholesterol 70 mg, Carbohydrates 20 g, Fiber 3 g, Protein 48 g, Calcium 138 mg, Sodium 206 mg

Baked halibut - ready to top with the pineapple salsa!

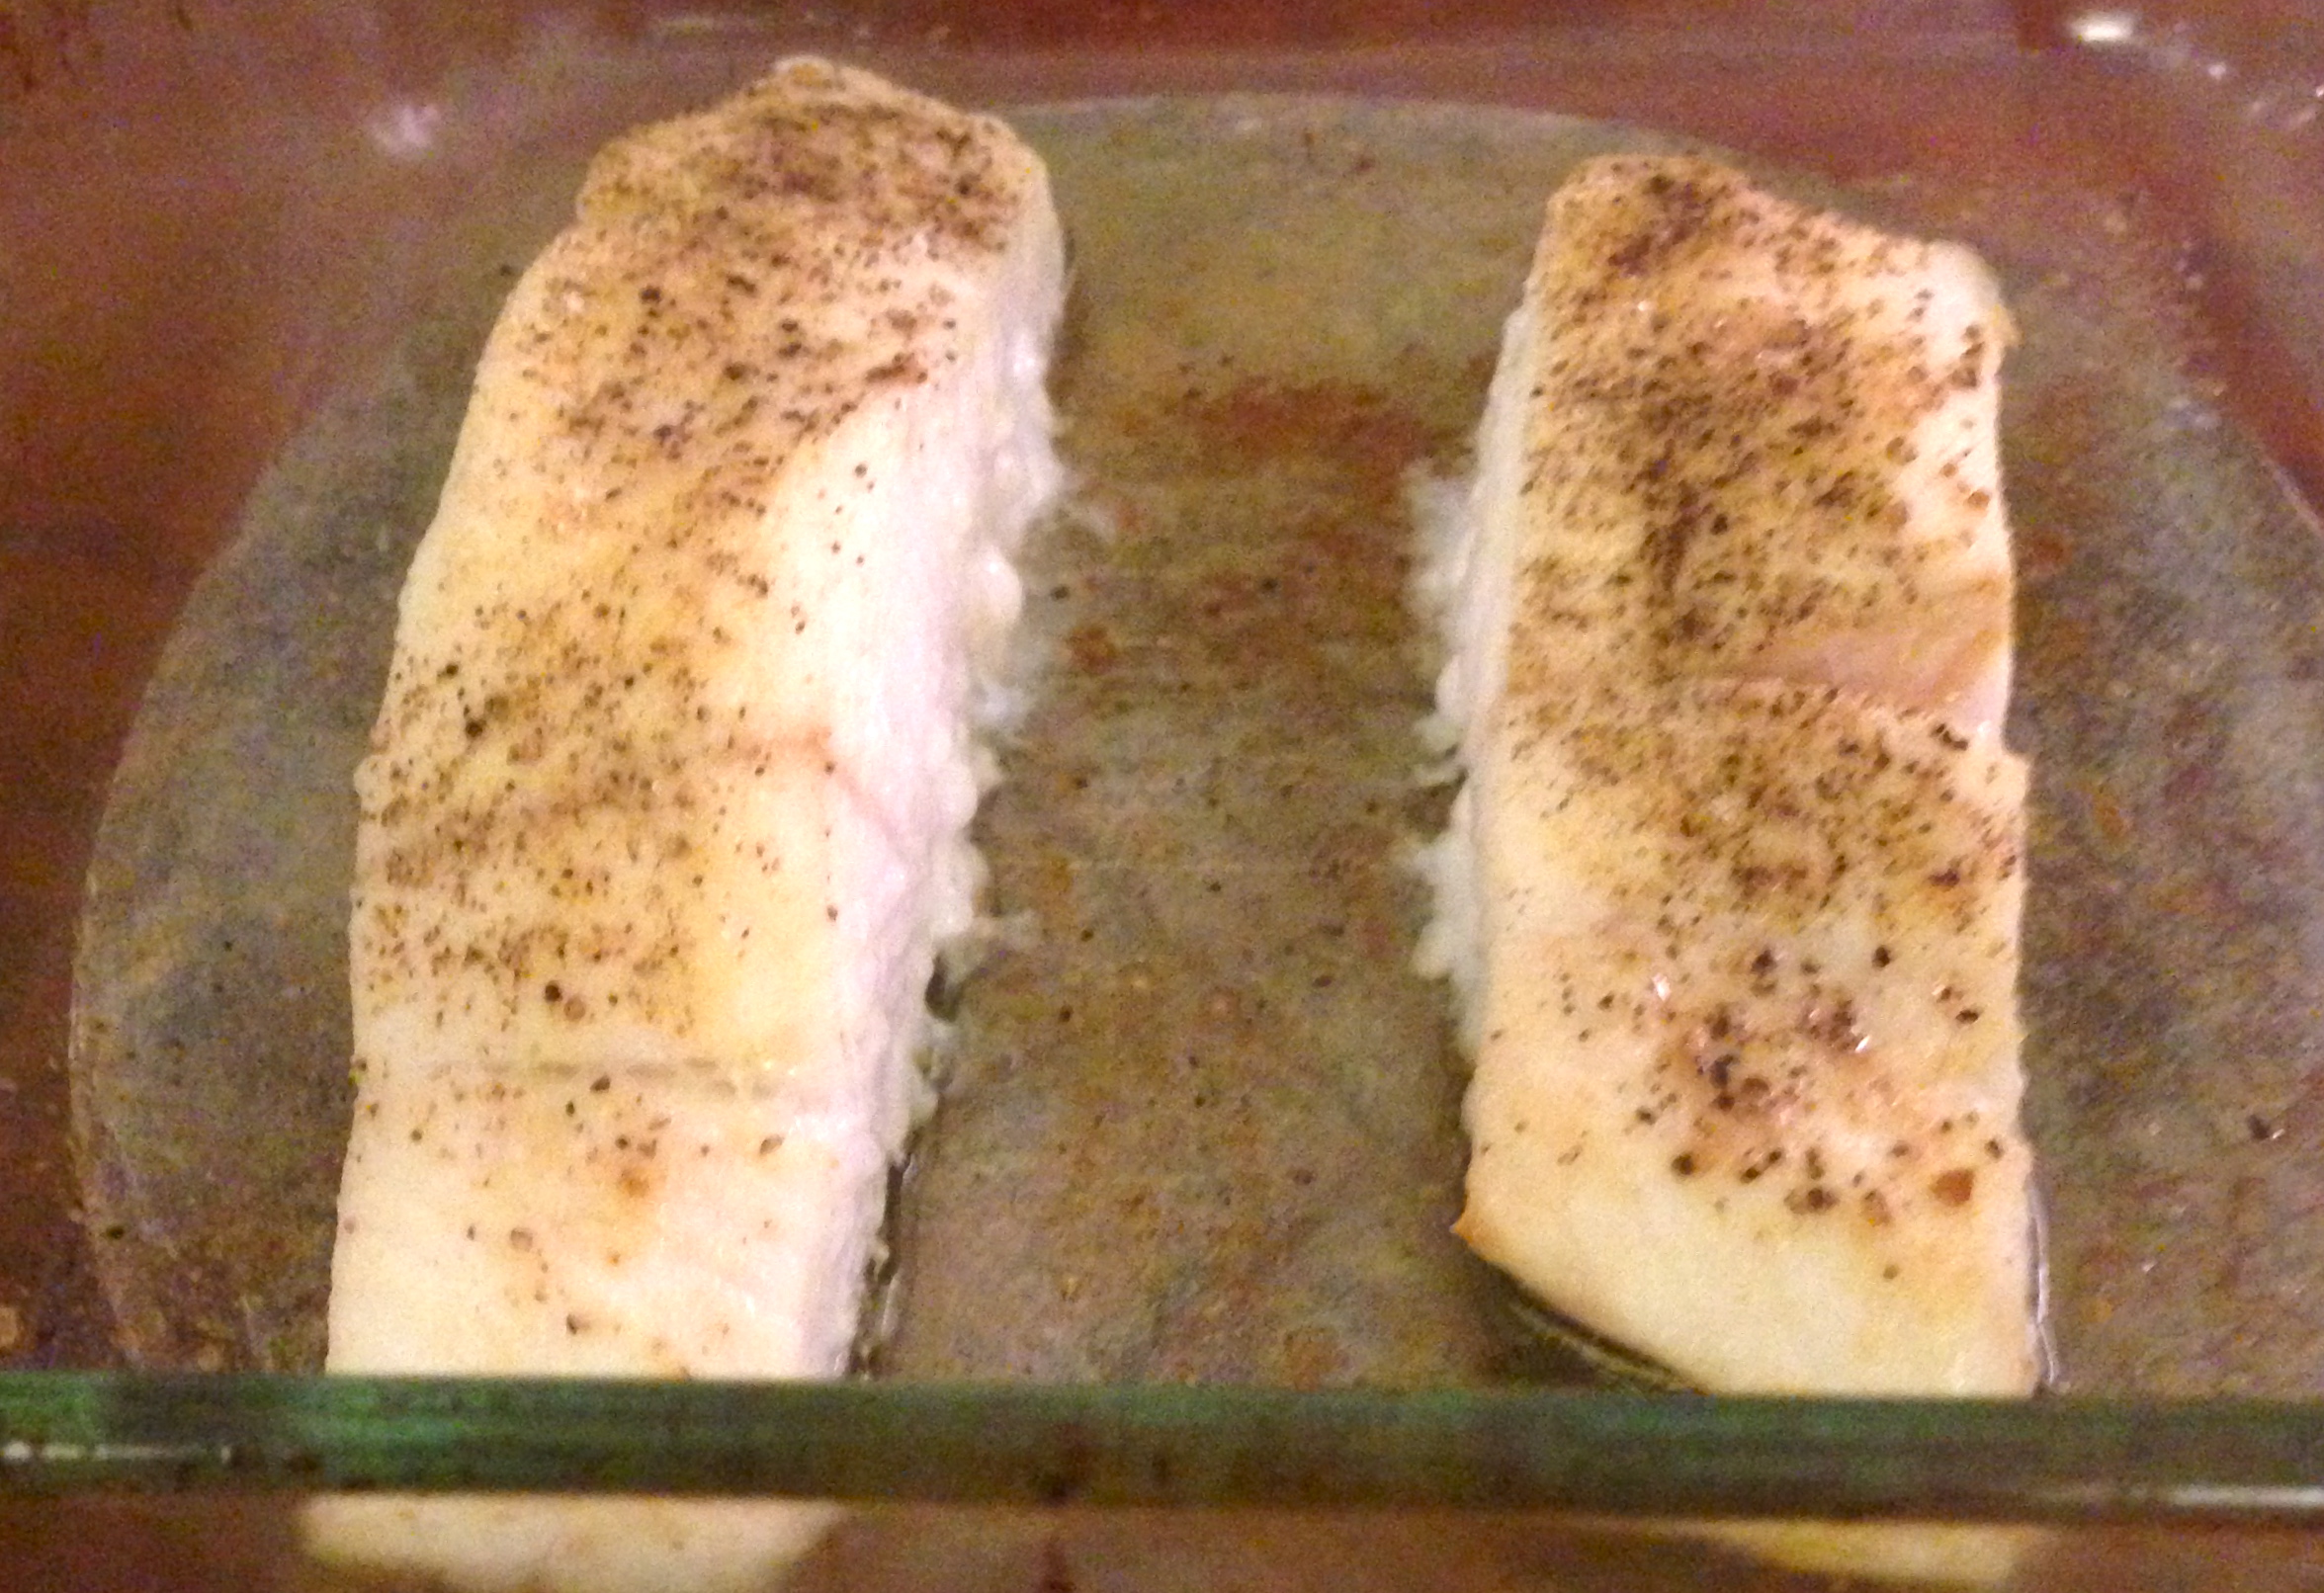
Baked halibut – ready to top with the pineapple salsa!


Shredded Balsamic Sprouts

Shredded Balsamic Brussels Sprouts

Okay, I promise after this I will post something about a food that is not in the cruciferous veggie family – but why not try one more recipe involving a member of this nutritious family?! These shredded sprouts take less than 15 minutes to prepare and are a sweet and tangy way to enjoy this vegetable. Also, onions, with their sulfur-containing compounds, boast some impressive health benefits as well and, paired with the sprouts and the balsamic, make for a tasty side dish that can be enjoyed hot or cold!

IMG_0885

Ingredients (serves 4)

3 C shredded Brussels sprouts (you can look for bags of shredded sprouts at your grocery store – I like Trader Joe’s! Or, if you prefer, you can cut your own sprouts!)

1/2 large yellow onion

1.5 Tbsp olive oil

1/4 C balsamic vinegar

1/8 C water

1/8 tsp garlic powder

dash salt

dash ground black pepper

ready to add the balsamic vinegar, water and spices!

ready to add the balsamic vinegar, water and spices!

Directions:

1. Warm olive oil over medium heat in large saucepan.

2. Chop onion. Add onion to olive oil. Cook approximately 5 minutes, stirring occasionally.

3. Add shredded Brussels sprouts to onion and olive oil. Cook approximately 5 minutes, stirring occasionally.

4. Add water, balsamic vinegar, garlic powder, salt and pepper to Brussels sprouts. Cover and cook 5-7 minutes, until liquid has mostly been absorbed.

5. Remove from saucepan – if there is a large amount of excess liquid then drain. Enjoy hot, or cold the next day!

The Goods: What’s Inside?

Nutritional Analysis Per Serving:

Calories 91 calories, Total Fat 6 g, Saturated Fat 1 g, Cholesterol 0 mg, Carbohydrates 10 g, Fiber 3 g, Protein 2 g, Sodium 60 mg, Calcium 31 mg


Some Sweet Sprouts

Brussels Sprouts with Walnuts and Pomegranate Arils

IMG_0728

In case you couldn’t tell, I’m on a cruciferous veggie kick. I try to eat seasonally when possible and cruciferous vegetables can grow throughout the cool, winter months. Also, cruciferous veggies offer a ton of health benefits and some studies suggest that increased intake of these veggies may be associated with a reduced risk of developing certain cancers.This sweet side dish is like wellness in a bowl –  walnuts are rich in omega 3 fatty acids, which reduce inflammation, and pomegranate arils are rich in antioxidants. Make sure you make extra – you’ll want the leftovers the next day!

Ingredients (serves 2)

2 C raw Brussels sprouts (I like to use Brussels sprouts that are on the smaller side)

1/4 C chopped walnuts, unsalted

1/2 C pomegranate arils

1 Tbsp olive oil

Dash salt

Dash ground black pepper

Directions:

1. Preheat oven to 400 degrees Fahrenheit.

ready to go in the oven!

ready to go in the oven!

2. Wash Brussels sprouts and dry thoroughly with paper towel. Cut the Brussels sprouts in halves or quarters, depending on the size of the Brussels sprouts.

3. Place Brussels sprouts on baking pan or in casserole dish. Drizzle olive oil over Brussels sprouts and season with salt and pepper.

4. Bake Brussels sprouts in oven for 10-15 minutes, stirring occasionally. After 10 minutes, remove Brussels sprouts from oven and add walnuts. Stir Brussels sprouts and walnuts together and place back in oven. Bake another 10 minutes-15 minutes, until Brussels sprouts are slightly crispy on the outside. Stir occasionally.

5. Remove Brussels sprouts from oven and add pomegranate arils. Mix all ingredients together and place back in oven. Bake another 5 minutes. Remove from oven and enjoy!

The Goods: What’s Inside?

Nutritional Analysis Per Serving:

Calories 239 calories, Total Fat 18 g, Saturated Fat 2 g, Cholesterol 0 mg, Carbohydrates 18 g, Fiber 7 g, Protein 6 g, Sodium 101 mg, Calcium 52 mg

yum!

yum!

Salmon and Cabbage Salad With Grated Ginger

Salmon and Cabbage Salad with Grated Ginger

This salmon salad will shake up your salad routine and get you excited for a plate full of veggies – and hearty salmon! Cabbage is a cruciferous vegetable and can grow in cool temperatures, so this salad is perfect for the fall and winter months, when vegetables can seem scarce. Plus, consuming at least two 6 oz portions of salmon per week supplies your weekly recommended amount of omega-3 fatty acids, which aid in reducing inflammation. Fresh ginger and a light drizzle of dressing spice up this salad and give it a distinct flavor that is anything but boring!

IMG_0257

Ingredients (serves 1):

6 oz salmon fillet

1/4 small head cabbage (doesn’t matter which color- whichever you prefer!)

1 large carrot

2 Tbsp ginger or miso dressing (I recommend 365 Ginger Soy Vinaigrette)

Non-stick vegetable oil cooking spray

1/4 tsp garlic powder

1/4 tsp ground black pepper

1/4 tsp onion powder

1/8 tsp fresh ginger, grated (I use a cheese grater)

Directions:

1. Preheat oven to 350 degrees Fahrenheit.

2. Spray casserole dish with cooking spray. Place salmon fillet in casserole dish.

3. Season salmon with spices (garlic powder, onion powder, ground black pepper and grated ginger).

4. Place salmon in oven. Bake 15-20 minutes, or until cooked through (reaching an internal temperature of 145 degrees Fahrenheit).

5. While salmon is in oven, chop cabbage. Place cabbage in strainer and rise. Dry thoroughly. Transfer cabbage to plate.

6. Skin, wash and dry carrot. Shred carrot over cabbage using a cheese grater.

7. Remove salmon from oven and let cool for 2-3 minutes.

8. Place salmon on top of salad. Drizzle dressing over salad. Serve.

The Goods: What‘s Inside?

Nutritional Analysis Per Serving

Calories 371 calories, Total Fat 11 g, Saturated Fat 1 g, Cholesterol 114 mg, Carbohydrates 21 g, Fiber 6 g, Protein 47 g, Calcium 139 mg, Sodium 511 mg

*note: If you are concerned about your sodium intake, try to look for a low-sodium salad dressing. Also, you can make your own dressing using low-sodium soy sauce and mustard!

Cancel Your Take-Out Order!

Tofu and Veggie Stir-Fry with Brown Rice

IMG_0226

Why order in greasy food when you can cook your own stir-fry with only ingredients you know are wholesome? This stir-fry can be made with any lean protein  – I’ve replaced the tofu with shrimp before, as well as chicken, and it’s always been amazing and authentic tasting. Also, depending on which veggies I find at the farmer’s market or grocery stores, I’ve switched up the components of this dish to reflect seasonality and local offerings when possible. This healthy stir-fry will fill you up with fiber and protein and give you a hearty dose of antioxidants. Wok not included!

Ingredients (serves 2):

8 oz extra firm tofu

1/2 C sugar snap peas

1 C broccoli florets

2 baby bok choy

1/2 onion, diced

2 large carrots, sliced

1 C mushrooms, sliced

1 C brown rice

1/4 C corn (off the cob – I like to buy frozen corn!)

1 Tbsp olive oil or canola oil

1/4 C low-sodium soy sauce (or you can try a different stir-fry sauce – just try to avoid products with ingredients such as caramel color and high fructose corn syrup!)

This time I used baby corn!

This time I used baby corn!

Directions:

1. Steam carrots in microwave until soft (approximately 5 minutes).

2. Steam broccoli florets in microwave for 1 minute and 30 seconds.

3. Steam corn in microwave for 45 seconds.

4. Cook brown rice according to directions on package (I find it easiest to buy fully cooked frozen brown rice and steam it in the microwave).

5. Drain excess water from tofu and gently squeeze dry with a paper towel. Cut into small cubes.

6. Pour oil and half the soy sauce (about 2 Tbsp) into skillet and warm over medium heat.

7. Place onion and mushrooms in skillet and cook for 5 minutes, stirring occasionally.

8. Slice bok choy into large pieces and add to skillet.

9. Wash sugar snap peas and pat dry. Add steamed carrots, corn and broccoli to skillet. Add tofu and sugar snap peas. Add remaining soy sauce and cook for another 5 minutes, stirring occasionally.

10. Place brown rice on plate and pour mixture over rice. Serve hot and enjoy!

the Goods: What’s Inside?

Nutritional Analysis Per Serving:

Calories 377 calories, Total Fat 15 g, Saturated Fat 2 g, Cholesterol 0 mg, Carbohydrates 46 g, Fiber 9 g, Protein 19 g, Calcium 194 mg, Sodium 739 mg

Cauliflower Power

cauliflower200-73fa7e31835d86c2f092faa660cc370112350a0f-s6-c30Why Eat Cauliflower?

Cauliflower is a member of the cruciferous vegetable family and  therefore joins the likes of Brussels sprouts, cabbage, broccoli, bok choy and other veggie powerhouses. Even though these veggies are personal favorites of mine, many people seem to dislike this veggie family, even though they have powerful antioxidant properties. So, I have made it my mission to create tasty recipes that incorporate these vegetable superheroes in an effort to spread the love – and the deliciousness. Cauliflower can grow in cool temperatures and therefore can be a staple throughout the fall and winter months at farmer’s markets and seasonal markets. So, next time you’re at your local market, give cauliflower a chance!

What Do I Do With Cauliflower?

Cauliflower is an easy vegetable to begin your cruciferous vegetable tasting, since it can actually be prepared to taste just like an all-time favorite: potatoes! Lower in calories and carbohydrates, but similar in consistency, this alternative can be swapped into many potato recipes! The two recipes below are kid-friendly ways to introduce your family (or anyone) to cauliflower – I promise you won’t even have leftovers!

Recipe #1: Cauliflower Breadsticks

yum!

yum!

I adapted this recipe that was given to me by a friend and slimmed down traditional cheese sticks. All of the flavor for less than 50 calories per “bread”stick? That is true cauliflower power!

Ingredients (serves 12):

1 large head cauliflower (approximately 6” diameter)

2 cloves garlic, minced

2 large eggs, lightly beaten

3 oz low-fat shredded mozzarella cheese

½ tsp onion powder

Dash salt

¼ tsp ground black pepper

Non-fat vegetable oil cooking spray

Directions:

  1. Preheat oven to 450 degrees Fahrenheit.
  2. Wash and dry cauliflower and chop into florets. Steam (either in microwave or over boiling water) until soft (approximately 10-15 minutes).
  3. Place cauliflower in food processor and blend until pureed. The cauliflower should have the consistency of mashed potatoes.
  4. In a large bowl, mix eggs, 2 oz cheese (2/3 of the cheese), spices (garlic, onion powder, salt and pepper) and pureed cauliflower.
  5. Spray a 9×13 inch casserole dish with non-stick vegetable oil cooking spray. Transfer cauliflower mix into casserole dish and spread into a thin, even layer with spatula.
  6. Bake in oven for approximately 20-25 minutes, or until the top is slightly brown. Remove from oven, add remaining cheese on top and bake until cheese is melted (another 5 minutes).
  7. Cut into squares (3×4) to yield 12 cauliflower breadstick squares. Enjoy!

The Goods: What’s Inside?

Nutritional Analysis Per Serving:

*1 serving is 1 square

Calories 43, Total Fat 2 g, Saturated Fat 1 g, Cholesterol 36 mg, Carbohydrates 3 g, Fiber 1 g, Protein 4 g, Calcium 72 mg, Sodium 86 mg

Recipe #2: Cauliflower Mashed “Potatoes”

just like mashed potatoes!

just like mashed potatoes!

This recipe is a true favorite of mine – so easy to prepare and tastes just like your favorite comfort food – only take even more comfort in the fact that it contains less saturated fat, less carbohydrates and fewer calories than the traditional potato version with cream.

Ingredients (serves 4):

1 large head cauliflower (approximately 6” in diameter)

1 clove garlic, minced

1 Tbsp butter or margarine

¼ tsp ground black pepper

¼ tsp salt

Directions:

  1. Bring a medium-sized pot of water to a boil.
  2. Wash and dry cauliflower. Cut cauliflower into florets and transfer into pot of boiling water. Boil until soft (approximately 5-7 minutes).
  3. Strain water from cauliflower and transfer cauliflower into food processor. Blend until pureed (it should be the consistency of mashed potatoes).
  4. Transfer cauliflower into serving bowl. Add butter and spices and stir until well combined. Enjoy!

The Goods: What’s Inside?

Nutritional Analysis Per Serving:

Calories 63, Total Fat 12 g, Saturated Fat 2g, Cholesterol 8 mg, Carbohydrates 8 g, Fiber 4 g, Protein 3 g, Calcium 35 mg, Sodium 210 mg

*raw cauliflower photo courtesy of: http://media.npr.org/kitchen/2008/04/cauliflower/cauliflower200-73fa7e31835d86c2f092faa660cc370112350a0f-s6-c30.jpg 

Ever Wonder How The French Stay So Thin? They Eat This!

French Toast with Strawberries, Cinnamon and Maple Syrup

Okay, maybe not. But this slimmed down French toast is pumped up with extra nutrition and skimps on fat, so you can enjoy this childhood favorite. This recipe uses whole wheat toast and one egg with one egg white, so you can fuel up with fiber and protein. Also, some studies suggest that eating cinnamon with bread may help to maintain blood glucose levels and prevent a spike in blood sugar. Plus, it’s delicious!

IMG_0587

Ingredients (serves 1):

2 slices whole wheat bread (I like Vermont Bread Company Soft Whole Wheat)

1 large egg, 1 large egg white

Splash of skim milk (about 1 Tbsp)

4 medium strawberries

3/4 tsp cinnamon

1 tsp butter

nonstick vegetable oil cooking spray

1 Tbsp maple syrup

dash ground black pepper

dash salt

almost ready to flip!

almost ready to flip!

Directions:

1. Spray medium sized pan with nonstick vegetable cooking spray and warm over medium heat.

2. Crack 1 egg into bowl. Crack second egg and separate the egg white by transferring the yolk back and forth between the two halves of the egg shell, allowing the egg white to fall into the bowl below. Discard shells and one remaining yolk (*note: you can also buy a carton of egg whites and use the equivalent of 1 large egg).

3. Add splash of milk (about 1 Tbsp) to eggs. Add salt and pepper and scramble well with fork.

4. Soak each piece of bread in the egg mixture (coating well) and transfer to pan.

5. Cook bread about 7-10 minutes on each side, until French toast becomes golden brown and egg is cooked thoroughly. Transfer to plate. Top with butter, cinnamon, strawberries and maple syrup. Enjoy!

The Goods: What’s Inside?

Nutritional Analysis Per Serving:

Calories 300, Total Fat 9 g, Saturated Fat 4 g, Cholesterol 196 mg, Carbohydrates 42 g, Fiber 4 g, Protein 14 g, Sodium 729 mg, Calcium 114 mg

Green Eggs, No Ham

Sunny Side Up Eggs with Avocado on Toast

This easy breakfast is filling, delicious and offers protein, healthy monounsaturated fat and fiber, along with vitamins and minerals such as vitamin K, folate and potassium. I know the morning can be rough, but this breakfast takes about 10 minutes to make and will keep you full for hours, without compromising your calories.

IMG_0576

Ingredients (serves 1):

2 large eggs

1/4 avocado

1 slice whole wheat bread

Nonstick vegetable oil cooking spray

dash salt

dash ground black pepper

mashed avocado on toast (also amazing on its own!)

mashed avocado on toast (also amazing on its own!)

Directions:

1. Spray small pan with nonstick vegetable oil cooking spray. Warm over medium heat.

2.Slice avocado in half and slice one half in half again. Remove fruit from skin and transfer to small bowl. Mash with fork. (*Note: If you save the half with the pit, the avocado will not brown as fast. Store in refrigerator in air tight plastic bag for 1-2 days)

3. Place bread in toaster and warm until toasted and golden brown (about 5 minutes).

4. Crack eggs into pan (or into bowl first, if you prefer, and transfer into pan), add salt and pepper and cover. Cook until white is solid but yolk is still somewhat liquid (about 5 minutes). There should be a fine white film over the yolk.

5. Remove toast from toaster and transfer avocado on top of toast, spreading evenly in a thin layer. Add egg on top once cooked. Serve hot and enjoy!

The Goods: What’s Inside?

Nutritional Analysis Per Serving:

Calories 323 calories, Total Fat 17 g, Saturated Fat 4 g, Cholesterol 372 mg, Carbohydrates 27 g, Fiber 5 g, Protein 17 g, Sodium 711 mg, Calcium 82 mg

*Note: This nutritional analysis includes a bread that is not low sodium and also a dash of table salt. Salt content may vary.

ready to eat!

ready to eat!

Warm Kale, Beet and Feta Salad

Warm Kale, Beet and Feta Salad

This seasonal salad is packed with vitamins and minerals and will keep you warm in these chilly temperatures. Beets and kale are both vegetables that can be grown through the winter and bought at local farmer’s markets and grocery stores during this time when vegetables can seem scarce. The hearty, crisp taste of kale is balanced by the sweet taste of beets and creamy feta cheese in this warm salad, which is a cinch to make. As tasty as it is pretty, this winter-y salad will become your new favorite for entertaining – or just eating on your own!

IMG_0569

Ingredients (serves 4):

6 C kale, raw, chopped (wash thoroughly and remove large stems)

8 oz. baby beets (I like Melissa’s Ready-To-Eat Baby Beets, which are steamed, peeled and ready to eat. 1 package is 8 oz, which is about 5 baby beets. You can also roast your own beets! If you roast your own, you should do so before preparing this dish, as they should be ready to eat in this recipe).

1/4 C reduced- fat feta cheese, crumbledIMG_0567

1.5 Tbsp extra virgin olive oil

Lemon juice from 1/2 a lemon, freshly squeezed

1/8 tsp salt

1/8 tsp ground black pepper

1/2 C water

Directions:

1. Heat olive oil in large pan over medium heat (I recommend using a pan with large sides, or a pot, as the kale starts out piled high in the pan before it cooks down).IMG_0566

2. Add kale to pan. Add water and cover. Allow kale to cook covered for approximately 5 minutes. The kale should be a bright green color and there should be some excess liquid when the cover is removed.

3. Remove cover and stir kale until it begins to wilt, about 3 minutes. The liquid should be mostly evaporated by now. Add lemon juice, salt and pepper and cook another 2-3 minutes, stirring occasionally.

4. Cut beets into wedges and add to kale. Cook 2-3 minutes, stirring occasionally. Transfer from pan to serving dish. Top with feta cheese and serve warm. Enjoy!

The Goods: What’s Inside?

Nutritional Analysis Per Serving:

Calories 149 calories, Fat 8 g, Saturated Fat 2 g, Cholesterol 6 mg, Carbohydrates 18 g, Fiber 4 g, Protein 6 g, Sodium 235 mg, Calcium 176 mg

I served it with butternut squash ravioli!

I served it with butternut squash ravioli!

Baked Chicken Parmesan

Baked Chicken Parmesan

In these chilly temperatures, I’m craving comfort food. However, I don’t want to eat food that isn’t healthful – I just want to eat a warm, hearty meal. This chicken parmesan is baked, instead of being pan fried, and uses olive oil instead of egg to glue the breadcrumbs to the chicken. And did I mention the breadcrumbs are whole wheat? If you have thirty minutes, you have time to make this amazing twist on a traditional comfort dish.

IMG_0549

Ingredients (serves 2):

2 chicken breasts, approximately 8-10 oz. (I like using thin sliced chicken breasts)

2 cloves garlic, minced

2 Tbsp extra virgin olive oil

1 C marinara sauce (I like Classico Marinara with Plum Tomatoes)

1/3 C whole wheat breadcrumbs, seasoned (or use plain whole wheat breadcrumbs and season them yourself with garlic powder, salt and pepper)

1/3 C shredded part-skim mozzarella cheese

nonstick vegetable oil cooking spray

IMG_0547Directions:

1. Preheat oven to 365 degrees Fahrenheit

2. Warm olive oil and minced garlic in small pan over medium heat (approximately 3-4 minutes).

3. Spray casserole dish with nonstick vegetable oil cooking spray (light coating)

4. Place breadcrumbs in bowl. Set aside. Place chicken breast in skillet, one piece at a time, and coat both sides with garlic and olive oil (be careful – the pan is hot!!!). Transfer chicken breast to bowl with breadcrumbs and coat. Place chicken breast in casserole dish.

5. Bake chicken in preheated oven for 20-25 minutes (the chicken should reach an internal temperature of 165 degrees Fahrenheit)

6. Remove chicken from oven. Add sauce and cheese and bake chicken for another 5-10 minutes, until cheese is melted.  Enjoy!

The Goods: What’s Inside?

ready to be baked in the oven!

ready to be baked in the oven!

Nutritional Analysis Per Serving (1 serving is one chicken breast with half of the ingredients listed above)

Calories 489, Total Fat 25 g, Saturated Fat 6 g, Cholesterol 106 mg, Carbohydrate 22 g, Fiber 4 g, Protein 45 g, Sodium 962 mg, Calcium 245 mg